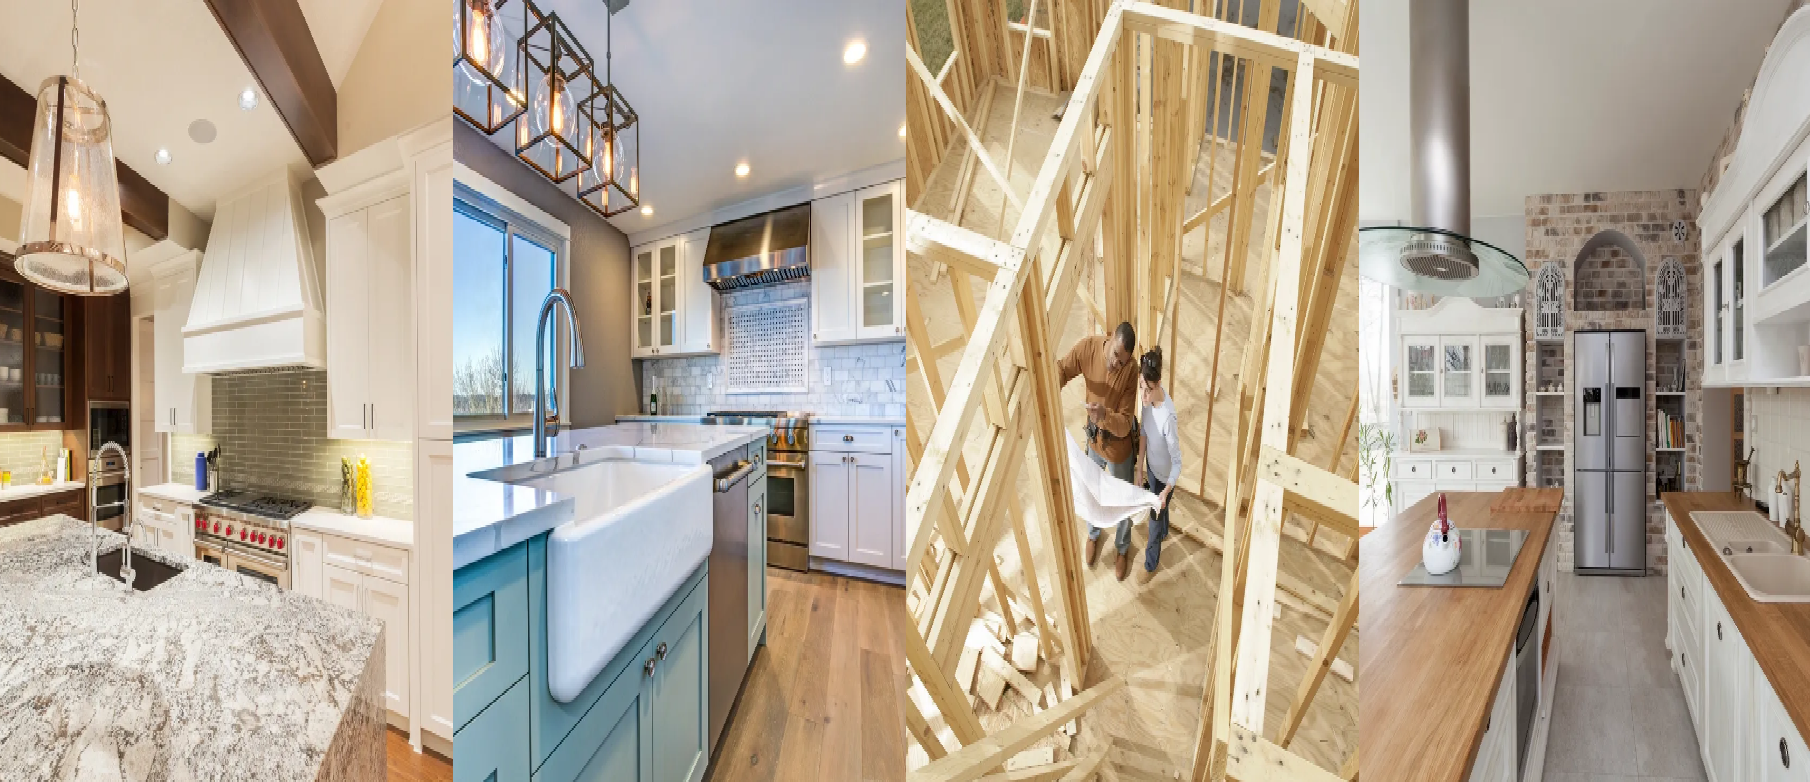
Custom Kitchen Remodelers & Listings
"Find top locally-owned luxury kitchen remodelers"
  • Home
  • Kitchen Remodelers By City
  • Custom Cabinets
  • Recent Cities
    • Malibu CA
    • Greenwich CT
    • Alamo Heights
    • Palos Verdes CA
  • Kitchen Remodelers by Zip Code

Start your next custom kitchen remodel with top contractors

We are a nationally recognized group of home remodeling pros specializing in custom cabinets, room additions and more in your home town. Contact us for a free quote below:

Get My Free, No Hassle Remodeling Quote>>

Commercial Roofing De-Mystified | Maintenance Tips

11/3/2013

 
Commercial roofers across the US weigh in with tips on handling materials, repairs and more:

"Asphalt shingles have strips of adhesive that bond the shingles together after they are installed. The heat from the sun softens the adhesive. When storing asphalt shingles put them on wood pallets in a shady spot. Cover with plastic sheeting so they do not get wet before they are installed. Do not stack the bundles over 4 feet high." -Jim, Charlotte NC

"Store wood shingles and shakes in their original bundles in a dry place. If left outdoors, put them on wood pallets to get them off the ground and cover with plastic sheets. Metal roofing panels are stored horizontally on wood pallets to keep them clear of the ground. Be careful they do not bend, twist, or get scratched. Cover with plastic sheeting. Be careful with any chimney caps and chimney cracks that may arise as well" -Luis, Houston Waterproofing

"After a decision has been made on the type of roofing material to be used, the amounts of the various materials needed must be estimated. Roofing materials are estimated and sold by the square, which is the amount it takes to cover 100 square feet of finished roof surface, no matter what the actual surface area of shape of the particular roofing pieces. To find the number, divide the roof area by 100." -Alex, Oakland CA (Bay Area Roofing)

"Once the total square footage is found, divide by 100 to find the number of squares of roofing needed. The base is the width of the intersecting building. The height is the distance from the exterior wall to the point where the ridge of the intersecting roof meets the other roof." -Rob, Flower Mound

Custom Cabinet Posts from Around Texas

8/16/2013

 
We asked some of the top contractors and kitchen remodelers in Austin, San Antonio, Houston and Fort Worth to share design tips, ideas and inspiration when it comes to custom cabinet installs. One topic that kept arising was in regards to coordinating looks of custom cabinets to catering-style and French ranges. These top-of-the-line appliances offer fantastic cooking capacity: two or more multifunction ovens, five or six gas burners, integral broilers and grills, for example. You might even get warming drawers, work stands, and rotisserie facilities. Freestanding, they are reasonably heavy and need a strong floor. A favorite with professional cooks, they cost big money, though less-expensive and scaled down versions are on the increase. Some include hanging rods for utensils. You may learn more at the links above.

The Eco Kitchen | Going Green Ideas

8/16/2013

 
The kitchen is usually the least eco-friendly room in the house. Appliances eat up energy and water, and we are carless with these resources. We use detergents and disinfectants that are full of petrochemicals and phosphates, and we fill our waste cans with non-biodegradable waste.

Whether you are creating a new custom kitchen from scratch or just going for a revamp, put environmental issues at the top of your shopping list, and buy appliances and products that have good eco-friendly credentials. 

Four Essentials for the Eco Kitchen:

  1. Choose eco-friendly materials. Wood is one of the best, but make sure it comes from a sustainable source, or buy reclaimed boards. Cork and ceramics also have good eco-credentials (as long as they haven't been treated with chemical lacquers and varnishes), and stone and steel rate fairly highly. Avoid plastics unless they are recycled, and use plywoods and particleboards sparingly, if at all.
  2. Opt for eco-appliances. These days, most come with a rating to show you how efficient and energy-saving they are.
  3. Avoid chemical-based kitchen cleaners. Basic pantry items can clean just as effectively and won't pollute.
  4. Minimize packaging. Buy food with as little packaging as possible and recycle as much as you can.

Five Ways to Expand Space in a Small Kitchen

8/7/2013

 
  1. Rationalize appliances: Minimize the amount you keep in the kitchen. Appliances can be placed in a cellar or another room; cleaning products can be stores under the stairs; and dishes or glassware may be stacked away in living room cabinets.
  2. Avoid eye-level cabinets: Although wall-mounted cabinets will give you extra storage space, they will also make the room seem cramped. Without them, the perimeter of the room will be visible, and the kitchen will seem more spacious.
  3. Wall of glass: Use glass for a kitchen wall or ceiling. Having a see-through rather than a solid barrier, even on just one side, will make a small kitchen seem bigger.
  4. Clever storage: If you have little room for cabinets, use the walls, the ceilings, even the windows for storage. Divide cabinets internally with one or two shelves to give yourself twice the storage space. And customize the backs of cabinet doors with narrow shelves and hooks. A long, narrow shelf can also be squeezed above the backsplash. 
  5. Invisible solutions: Use as many pull-out/foldaway features as you can. Anything that can be invisible when not in use is an asset in a small kitchen.

Inspecting Your Home's Doors After a Tornado

4/1/2013

 
If doors are to work properly, they must be installed level and plumb. Open and close the main exterior door several times. Does it scrape the floor? If so, something is out of line. Either the door is improperly or the floor is not level.

Many door problems are caused by poor workmanship. If a door is out of level or out of plum, rehanging may be required. Check the floor all around the doorway. In this area the floor is often unlevel, but unless the problem is severe, there is no reason to be concerned.

In most homes, cold drafts from underneath doors are a common problem. Exterior doors and doors leading to an unheated areas such as a garage or basement should be inspected for gaps at the bottom. These gaps should be weather-stripped.

Air leaks at the tops and sides of exterior doors are usually not as critical as those at the bottom. But these leaks also waste fuel, also all sides of exterior doors should be weather-stripped.

Do the hinges squeak when you open the door? The solution may be simple – like oiling the hinges. Or, the doors maybe warped, placing a strain on the frame. Warped doors that won't close tightly and that are beyond the help of weatherstripping should be replaced. You might also consider balcony or deck waterproofing, according to the owner of JCE Waterproofing in Dallas, Texas.

If a replacement is needed, look for a prime door with insulation value as well as beauty. Doors with a polyurethane core insulate better than solid wood doors.

Look at the framework that surrounds the doors. Do you see any cracks? Cracks often indicate that the wood may not be in good condition. You obviously don't want trim work that is rotting or decaying.

DIY Drywall Installation Techniques

3/22/2013

 
Drywall is perhaps the one pre-finish stage of construction that takes the longest and shows the least progress and it's timeframe. While drywall panels are relatively easy to manipulate and put in place, the numerous joints between the panels in the divots made for nails and screws must be filled and smoothed out to create a flat, seamless service for the eventual wall and ceiling finishes.

The first phase, hanging the drywall, takes the average three-person home remodeling crew about three or four days to complete, less so on simply designed homes or with more crewmembers. Most drywall panels need to be cut to accommodate windows and door openings, corners, arches and other features.

The panels also need to be nailed or screwed to be houses frame, with the edges of two panels often sharing a narrow stud. Where there is no stud or other structural member for securing the edge of a panel, some manufacturers offer metal clips that stabilize the drywall. Emailing pattern for drywall is typically 6 inches between nails or screws along the perimeter of each panel and 8 inches with the field of each panel. Once the drywall is hung in place, however, the interior of your home takes on a more realistic appearance.

No longer are you distracted by views through wall studs, now blocked by the drywall. You get a real, tangible sense of the width of your hallways and door openings, and a more clear idea about where furniture and artwork might go to cover these blank walls.

Unfortunately, if you visit the house again within a week or so, not much will have changed that you'll immediately notice. The next two phases of drywall installation, tape and texture, are slow moving. Simply, the wet compound, used to bridge the joints between drywall panels, cover fasteners and create finished quarters, needs to drive, be sanded and reapplied a few times before the walls are adequately smooth and seamless.

The initial but being in taping of joints, fasteners and quarters takes about a day or two. Then strips of paper are sent into a swath of joint compound along the length of each panel connection is a bridge to mitigate cracks and then are pressed tightly along the bud vase, securing it along the joint and squeezing the excess to either side of the tape. The excess is then scraped off and used as needed.

Read More

Quincy Kitchen Remodelers

1/28/2013


Spotlighting Kitchen Remodels in Quincy, MA - Free Quotes

quincy mass. kitchen after pic
We love the look of this kitchen after the renovation process. Today we spotlight a local Boston contractor group. Contact the top Quincy kitchen remodelers today (serving all of Boston and surrounding areas) or learn more about everything from custom kitchen renovations to full-scale remodels and everything in between.

Generous Kitchen Gallery - Plenty of Counter and Storage Area

When these Quincy, MA homeowners were in the planning stages of designing their new kitchen, they considered their lifestyle and unique needs. They wanted a kitchen that would be convenient, with plenty of storage, a layout that would contribute to speedy meal prep, and one that would offer all of this within a compact footprint. This was a trick remodel (above) but one that ultimately turned out looking great.

The answer to their kitchen remodeling needs? This hardworking gallery kitchen, which the homeowners refer to as the "step-saver" layout. In addition to a compact work area that makes food prep quick and convenient, they have counter surfaces adjacent to all food preparation and cooking areas, and ample storage. This kitchen is also designed to accommodate children's needs. The extra wide corridor allows both of them to occupy the kitchen and provides adequate clearance for kids in terms of kitchen countertop layout.

Gallery kitchens feature a tight work triangle with the stove, refrigerator, and sink in conveniently close proximity to one another. Kitchens also provide ample storage and counter space. The homeowners designed their kitchen to be chock-full of convenient features. Pull-out shelves in the base cabinets make it easy to access items stored at the back of shelves. Tall pantry-style cabinets at one end of the kitchen eliminate the need for a separate pantry, allowing more square footage to be devoted to the kitchen. We love this remodel and wanted to spotlight one of the top designs in the Quincy, MA area.

How to Mark and Cut Tile During a DIY Remodel

12/30/2012

 
(some info in this blog is courtesy of new BKRPros.com remodeler blog - used with permission)

In order for a cut tile to fit correctly, it must be marked correctly. There are no absolute rules; you merely make enough notations on the til itself to ensure an accurate fit in your new kitchen or bathroom area. A few pointers:

On glazed tiles, use a fine-tip felt pen to mark cut lines. On unglazed tiles, which might absorb ink, use a scratching tool such as a nail, or attach a piece of tape to the tile and mark the tape with pen, pencil, or grease pencil. The latter method is suitable for any masonry product.

When an entire row of cut tiles is required, do not assume that each tile should be cut to the same size. Check the distance between the last set tile and the wall at several points along the row.

Indicate anything you feel will be helpful while cutting. For example, draw a scribble across what will be the waste area so that you know on which side to allow for the amount lost by the saw cut. Code marked tiles as to their locations. Remember to write the code in an area that will not be cut off.


Drawing cut lines

The following are specific descriptions of how to mark tiles in order to fit them accurately around different obstacles you may encounter.

Wall and floor edges:  Simply measure the distance between wall edge and the last bathroom tile set during a renovation. Or use the following method: Set tile to be cut exactly on top of last full tile that was set. Place a shim equivalent to width of two grout lines vertically against the wall, and then set a marker tile on top of the other two.

Corners: Use a straight cut method twice, once for each side.

Around fixtures: These can be marked by measuring the distance from last set tile to edge of fixture and marking that measurement on the tile to be cut. Since cut edges will be covered by escutcheons, these small cuts need not be exact.

Frequently Asked Kitchen Layout Questions

12/27/2012

 
Can someone else do the drawing?
Drawings can be prepared by designers at home centers and by architects and designers, but it's helpful to map the space and have some idea before you meet with a professional kitchen remodeler. Better preparation means more productive work sessions.

What if I'm doing it all myself?
If you will be actively involved in the construction phase, then your drawings are much more critical and must be very accurate. Numerous online tools are available. Have your drawings checked by professionals, and comply with all local codes.

What if I'm not moving appliances?
With many kitchen remodeling and renovation projects, the homeowners choose to leave the refrigerator, sink and dishwasher where they are. If that is your plan, you probably don't need to go through all the trouble of drawing floor plans and elevation views but you will still need to measure and consult with a professional.

What's the difference between a floor plan and an elevation?
A floor plan is an overhead view of the entire space on one piece of paper. This is the view that best shows the layout and traffic patterns, window and door placement, and locations of appliances and cabinetry and fixed objects. An elevation view is drawn from the perspective of one looking directly at an interior wall. It indicates scale and proportions, but it is a two-dimensional drawing and will not show perspective.

What tools do I need to get started with a remodel?
Two tape measures, and a stepladder. You also need 1/4 inch graph paper, tracing paper, a notepad, pencils, a scale, ruler and erasers. Recruit a helper for measuring; the results will be more accurate.

Article by Anthony Adams

Health Conscious Storage

12/25/2012

 
Kitchen cabinets, arguably the strongest overall design statement in a kitchen, are a great investment. A particularly noteworthy feature is the appliance garage. The front rolls up when appliances are needed but otherwise stays down so that the kitchen stays neat.

Inside the garage are a shelf and an outlet in the granite. An appliance can be plugged in and used on the spot. In fact, it's important to place outlets and switches at each workstation. Even with two cooks, no one is inconvenienced. By being positioned at counter level, this storage unit prevents unnecessary bending or reaching up for heavy appliances.

Installing cabinet drawers ensures easy access. It's wise to store items needed on a daily basis on the top drawers to minimize bending down.  Stooping for cookware causes a sore back, especially if the pots and pans are heavy. They, too, belong in a top drawer. In this kitchen, drawers make up most of the cabinets. Although many conventional drawers pull out three-quarters, these are full extension so that every inch of space is reachable.

Locating utensils in a drawer as close as possible to the work space where they will be used cuts down on extra movement. For example, mixing bowls can nest in a drawer immediately below the countertop where the whisk, spoons, and other tools are clustered. The brushed-nickel pulls have a slim, traditional line. They're easy to grab and pull. 

More Convenient Features

Keep a desk are adjacent to the kitchen as a control center for the family. This keeps clutter off countertops and out of kitchens. Upper cabinets in the desk area are provided for storage for cookbooks and binders. Lower cabinets features hanging file folders to keep family business in order and close at hand.

When planning a desk area near a kitchen, consider how you will use the space. Provide enough surface area for a printer, computer and writing space for homework, if necessary. Desk-area cabinets can be fitted with inserts suitable for books, files, computer hardware, and other specific storage functions  Under-cabinet lighting in this area provides task lighting to illuminate desk work.
<<Previous

    Specializing in:
    -Kitchens
    -Bathrooms
    -Additions

    Friends:
    Dallas Waterproofing
    Houston Waterproofing
    -Highlands Medical and Wellness Primary Care in Carrollton Texas

    Picture
    Picture
    Picture

    Search For Kitchen Remodelers By City:
    University Park Kitchen Remodelers
    Highland Park (Dallas)
    West University Kitchen Remodelers
    Pinecrest Kitchen Remodelers
    Malibu Kitchen Remodelers
    Greenwich Kitchen Remodelers
    Lake Forest Kitchen Remodelers
    Bethesda Kitchen Remodelers
    Deerfield Beach Renovations
    Sausalito Kitchen Remodelers
    Southlake Kitchen Remodelers
    Plainfield Kitchen Remodelers
    Johns Creek Kitchen Remodelers
    -Westport Luxury Kitchen Remodelers
    Home Depot
    Google+ - Pinterest
    Find us on Google+
    Articles by Anthony Adams

    Archives

    November 2013
    August 2013
    April 2013
    March 2013
    January 2013
    December 2012

    Categories

    All
    Cabinets
    Kitchen Island

    RSS Feed

    houzz interior design ideas
Powered by Create your own unique website with customizable templates.